Tuesday, November 15, 2016

Strawberry Bavarian Cream Dessert

I believe recipes are successful when they stand the test of time. If you loved something as a kid and still love it just as much as an adult, it's something special. Growing up, there were two desserts I requested regularly for special occasions. One was my Nana's decadent Texas Bar Cake (a clue to my future, no?!), which I had for my birthday every year. I will definitely cover this recipe in a later post.

But today is the day for my Geema's Strawberry Bavarian Cream Dessert. This dish holds a special place in my heart because over the years Geema noticed how obsessed I was with it. She began making one for our family gatherings and an extra one just for me to have later. I don't think she ever served this as a dessert actually. It was always a side dish in the culinary days of Jello-everything. And our family always called it Strawberry Mold because, yes, it was poured into a decorative mold and served in all its jiggly glory. I didn't think our family's name for it would translate into an appetizing title for this post. But believe me when I tell you it's so tasty. My husband requests it for his birthday instead of cake. It's whipped to a light and airy consistency with a ton of strawberry flavor from the whole chunks of berry and berry juice. Some may think these types of recipes are dated. I call this one delicious.

Another interesting side note: I didn't get around to asking my Geema for her recipe until she was well into her 80's and her memory was failing her. She hand-wrote her recipe and gave it to me with our wedding gift. The first time I made it, it was a disaster. Her directions weren't clear and she had left out a few important details, but her memory of how much it meant to me endured. And that's what matters the most. Enjoy!


Strawberry Bavarian Cream Dessert

Ingredients:

  • 10 oz. frozen strawberries, thawed
  • 1 package (3 oz) strawberry jello
  • 1 envelope Dream Whip, prepared (which includes milk and vanilla in package directions)
    Geema's recipe written with her signature green ink pen

Directions:

  1. After strawberries have thawed, drain the berries and reserve the juice in a measuring cup. Roughly chop berries and set aside. 
  2. In medium bowl, combine Jello and 1c boiling water. Mix until dissolved. 
  3. In the strawberry juice measuring cup that you set aside, add cold water enough to measure 1c in all. Add to the Jello bowl and mix. Cover and refrigerate until almost set.
  4. While Jello chills, prepare one envelope of Dream Whip. Follow package directions. Refrigerate until Jello is also ready. 
  5. When Jello is almost set, in a standing mixer or hand mixer beat until Jello until foamy. Add roughly chopped strawberries and beat until combined.
  6. Gently fold prepared Dream Whip into the strawberry mixture until fully combined. Pour into a decorative serving dish or individual serving pieces such as ramekins, parfait glasses, etc. Chill in the refrigerator until set. 
  7. OR you can can go old-school and chill in a gelatin mold and invert onto a serving platter before serving. Go ahead, make my Geema proud. :)

*Can be served with a dollop of whipped cream on top, if desired.

Wednesday, October 26, 2016

Roasted Pumpkin Seeds

It's the perfect time of year, and if you're carving pumpkins anyway then why not have a salty snack at the end of it all? I've been making these for a few years now, so I've learned some tricks along the way to make the process faster and easier.

Yesterday, the boys and I carved their pumpkins. We scraped out the insides, seeds, pulp, and all, and put it all in a big bowl. Then I preheated the oven while we finished carving the faces. Then I filled the big bowl of seeds/pulp with water about 3/4 full. The seeds should float to the top, leaving the pulp hovering underneath. You can skim the seeds out with your hands and put them in a colander to dry. And now you've passed the most tedious part! The rest is easy-peasy.

I carved two medium-sized pumpkins and had about 1 1/2 cups of seeds. I dumped them in a bowl, added olive oil, garlic powder, and salt. Then I mixed them up really well and spread them in a single layer on a parchment lined baking sheet. I popped them in the oven stirred them a few times throughout the roasting time, and there you have it! Enjoy your Fall treat and share with friends!

Roasted Pumpkin Seeds

Ingredients:

  • 1 1/2 c pumpkin seeds, separated from pulp and air-dried
  • 1 T olive oil or vegetable oil
  • Salt, to taste
  • Garlic powder, to taste (optional)


* I have also made other versions of seasonings, to taste:

  • sugar, salt, and cayenne powder 
  • salt and pepper
  • whatever sounds tasty


Directions:


  1. Preheat oven to 300 degrees. Line a baking sheet with parchment paper (I am in love with the Reynold's pre-cut parchment sheets....so easy).
  2. Separate seeds from pulp. Fill bowl holding seeds/pulp with water. Scoop out seeds that have floated to the top and place in a colander to drain and dry a bit. 
  3. In a medium bowl, combine seeds, oil, salt, and garlic powder ( or whatever combination of flavors you choose). Mix thoroughly and pour onto baking sheet. Spread out seeds into a single layer. 
  4. Roast for 45 minutes, stirring the seeds every 15 minutes (this will ensure an even roasting). *Keep a closer eye on them if you choose to put sugar in your seasoning, as they may go from perfect to burned very quickly. 
  5. Remove from oven, let cool a bit and enjoy them warm or store in an air-tight container once cooled. 


Friday, September 23, 2016

Thai Coconut Chicken Soup

I've been on a little bit of a Thai kick lately. I'm starting to feel like I may as well stock my pantry with cans of coconut milk, red curry paste, and curry powder. It feels like a good time of year for these curries and soups. They can be warm and comforting for Fall, but still reminiscent of summer with the coconut-y goodness and the bright, fresh lime flavors. 

My recipe this week involves a lot of mushrooms, which is another great Fall favorite in soups. And bonus! It's a quick one, especially if you buy the mushrooms pre-sliced. Next week's recipe will also be Thai but no mushrooms involved, for those of you who fear them. :) It's been so nice to get back to cooking after having been laid up for a while and eating mostly freezer foods. Though I will say, it was nice to have a break from my two year old crying at my feet while I prep dinner...
Enjoy!

Thai Coconut Soup
Adapted from America's Test Kitchen Family Cookbook

Ingredients:
  • 1 T vegetable oil
  • 2 T peeled, grated ginger (or 1tsp ginger powder)
  • 6 tsp Thai red curry paste
  • 1/2 tsp red pepper flakes (optional)
  • 6 c chicken broth
  • 3 T fish sauce or soy sauce
  • 1 T light brown sugar
  • 2 (14oz) cans coconut milk (the kind you find in the Asian foods aisle. Not the coconut milk in the dairy section, and not canned coconut cream...that will get you SUPER sweet results that we're not looking for here)
  • 1 lb chicken breast, sliced in 1 inch strips (or pre-cooked shredded chicken you have on hand)
  • 1 lb white mushrooms, trimmed and sliced thin
  • 3-4 T fresh lime juice (I usually more lime rather than less)
  • 1/2 c whole cilantro leaves

Directions:
  1. Heat oil in a large stock pot over medium. While oil heats, stir in ginger and curry paste. Mix around a bit and when it starts to sizzle, cook for about 1 minute. Putting the ginger and curry paste in before the oil is completely hot avoids a lot of spattering and spitting of oil and curry paste. If using red pepper flakes, add them now and stir for 15 seconds. 
  2. Add 1/2 c broth and stir until the curry paste is dissolved. Then stir in the rest of the broth, fish or soy sauce, and brown sugar. Bring to a simmer and cook for 15 min, partially covered. 
  3. Stir in the coconut milk, chicken, and mushrooms. Cook on a simmer until the chicken is cooked through, about 5 minutes. If you use pre-cooked chicken, you will still allow a simmer for 5 minutes to give mushrooms time to become tender. 
  4. Remove the pot from heat. Stir in lime juice to taste, and season with salt. Garnish bowls with cilantro. 

Wednesday, July 20, 2016

Thai Red Curry

Ok, the past couple of months have been crazy busy, to say the least. It's not like I haven't had time to cook, but I've been doing a lot of "fly by the seat of my pants" dinners just to get something on the table after a long day. Now it feels like things have settled down for a bit, so I'm hoping to get back into the swing of things.

I'm going to tell you all the MOST frustrating thing to me from this past month. I checked out a brand new cookbook from the library written by a well-known chef. I was excited. I read this book cover-to-cover, and I dog-eared (yes, dog-eared!) over twenty different recipes I was excited to try. Now, I learned a long time ago that test driving cookbooks from the library before investing in buying them is the way to go. Because there are a lot of big stinker cookbooks out there. They look pretty and glossy and have a picture of someone we recognize from TV, and we trust it! We trust the recipes to work! I know these chefs are amazing and so skilled at what they do, and I also know that there must be some publisher employee changing ingredient amounts and directions, because the first recipe I made was one HUGE flop. Ok, I wrote that one off as a mistake I made. It was a dish I had no prior experience with and didn't know what I should expect texture and flavor-wise. 

So then I tried the roast chicken. I have done roast chicken using so many different methods, I could do it with my eyes closed. I've read about different techniques and the whys of using certain ingredients and the hows of cooking it all to the perfect temperature without drying out the breast or undercooking the legs. Unfortunately for me, I ignored what I already know and followed the recipe in this book to the letter. I was trying to give it a fair chance! And there was flop number two, staring at me from the oven. Underdone, so I cooked it longer. Rubbery and pale skin, so I put it under the broiler to brown it at least a little. 

Long story not so short, I get SO irritated when I waste my time on recipes that don't work. I don't have time for that. You don't have time for that. And it annoys me that there are publishers, websites, and magazines out there that think we do have time for that, or we aren't smart enough to know better, or they just don't care. End rant. 

All of this has reminded me of why I started posting these recipes on a blog in the first place. I wanted a place to archive all the recipes I use that work. The ones that my husband or kids love and would want me to make again. And then I decided to share them for others out there that want to spend time making a recipe that turns out how it should and tastes good. I truly hope that the recipes I have posted have worked for you, if you've tried them. If you only knew the amount of dishes I have been excited to post about, and then didn't because I didn't think they turned out well. I promise to always try to keep it real. :) 

This week's recipe is one I have made more times than I can count. It's another good one from America's Test Kitchen. This Thai Red Curry is so coconut-y and citrus-y, sometimes I want to drink the sauce. ;) I make this one on nights when I don't have a lot of time. It's quick and tasty. Enjoy!

Thai Red Curry
Adapted from America's Test Kitchen Family Cookbook

Ingredients:

  • 1 T vegetable oil
  • 1 1/2 - 2 T red curry paste (commonly found in a small jar in the Asian foods aisle)
  • 1 14oz. can coconut milk (also found in the Asian food aisle, not the coconut milk in the refrigerated dairy section)
  • 2 T fish sauce or soy sauce
  • 4 tsp light brown sugar
  • 1 lb sirloin or flank steak OR chicken breast or thigh, thinly sliced (see note*)
  • 1 red bell pepper, seeded and stemmed, thinly sliced into strips
  • 1/2 lb sugar snap peas
  • 1 small head broccoli, cut into small florets
  • 1/2 c fresh basil, chopped
  • 1-2 T fresh lime juice
  • salt
  • white or jasmine rice, cooked per package instructions


*Red meat protein: to get 1/4 in thin slices of meat easily, place uncooked meat in the freezer for 20-30 min. Remove from freezer and slice while meat is slightly hardened. Slightly freezing hardens the meat just enough to prevent it from sliding back and forth. The same can be done for chicken, though I find if you use a sharp knife, getting a thin slice on uncooked chicken is easier than red meat.

Directions:

  1. Heat oil in a 12 in skillet over medium heat. Add curry paste, stirring and cooking until fragrant, about 1 minute (it will spatter, so take care!). 
  2. Add coconut milk, fish/soy sauce, and brown sugar. Whisk over a simmering heat until the sauce thickens a bit, about 5 minutes. 
  3. Add your protein and simmer until cooked through, about 3-5 minutes. 
  4. Add broccoli and cook for 1 minute. Then add bell pepper and snap peas. Cook until all veggies are tender but still crisp, about 5 more minutes. 
  5. Remove from heat. Stir in basil and lime juice to taste. Add salt to taste. 
  6. Serve over rice. Be sure to ladle a generous amount of the curry sauce on top. It's the best part!! 

Tuesday, June 7, 2016

Lemongrass and Chile Crusted Tofu

A big thank you to my friend, Carole, who directed me to another Vietnamese chef with great recipes! She also directed me to this recipe. This is the first of Luke Nguyen's recipes that I have attempted and I've made it several times now, tweaking it here and there. I'm really excited about trying more of his recipes as I go along.

I love the texture and how the tofu takes on the flavor of the marinade/stuffing. It's also a great main protein to pair with stir-fry veggies in my stir-fry sauce! This is a quick and easy weeknight meal.

Lemongrass and Chile Crusted Tofu
Adapted from Luke Nguyen

Ingredients:

  • 16 oz Firm or Extra Firm Tofu
  • 1 lemongrass stem, white part, diced (if not sold at your local grocer, Whole Foods usually carries it in fresh produce. I've started growing it in a pot since it repels mosquitoes and I can cook with it...two great functions!)
  • 1 T garlic, mashed
  • 1 Thai or 1/2 serrano chile, finely chopped, adjust to desired heat
  • 1/2 tsp salt
  • 1 tsp sugar
  • 1/2 tsp black pepper
  • Vegetable oil (enough to fill a 12 in. skillet to about 1/4 in. deep)
  • Cooked white rice (follow directions on package)

Directions:

  1. Open package of tofu and drain the liquid. Gently squeeze and pat dry as much as possible. Slice into 3/4 inch rectangles.
  2. In a small bowl, mix lemongrass, garlic, chile, salt, sugar, and pepper. Set aside.
  3. With the tip of a sharp knife, cut a shallow "x" shape (about half-way deep) into each tofu piece.
  4. Using your fingertips and a spoon, gently stuff the cuts with the lemongrass mixture. Spread any excess along the surface of the tofu.

  5. Meanwhile, heat oil in skillet over medium-hi heat. Once heated, carefully place the tofu in the oil, cut/stuffed side down (I gently place a slice on a metal spatula and ease it into the oil). Repeat with as many slices as will fit without crowding each other. Allow to fry, undisturbed, until the first side is nicely browned and crispy, about 2-3 minutes. Keep a close eye! Flip and brown the other side as well. Remove with a slotted spoon or tongs and drain on paper towels. 
  6. Repeat with remaining tofu until all is fried. 
  7. Serve over rice and with stir-fried veggies or roasted veggies. Enjoy!


Tuesday, May 24, 2016

Mom's Strawberry Shortcake

I grew up in Pennsylvania where summers were the most anticipated time of the year for me. I had a neighbor who gave my siblings and me free reign of both her property and the raspberries on her bushes. I remember eating them in the warm sun until my stomach ached. Other summer food memories that make me more nostalgic than most anything else are corn on the cob bought from road-side stands, home-grown tomatoes, and strawberry shortcake made with locally grown berries. 

Guys, my family was serious about strawberry shortcake. When my mom made it, it was never, ever dessert. It was strawberry shortcake for dinner those nights, and we could eat it until we were stuffed! Geez, I'm smiling into the empty room here as I type just remembering it. 

My mom used Bisquick to make her shortcakes, like her mother and mother-in-law before her. But don't try looking on the side of the box for this recipe, because a long time ago my Nana tweaked it to be even better. That's the recipe I'll be using here. So even though the tweaked recipe came from my Nana, the first images that I remember when thinking of this dish are bursting through the back screen door of the house I grew up in, smelling the shortcakes baking, and seeing my mom mashing up strawberries with a potato masher. Pure childhood excitement, seriously. Enjoy!


Mom's Strawberry Shortcake
makes 8 servings

Ingredients:

For the berries-

  • 4 quarts strawberries, hulled and rinsed (I tend to use way more because I like to drown my shortcake, but that's just me)
  • Sugar, to taste (the amount varies wildly depending on the sweetness of the berries)
For the shortcake-

  • 2 1/3 c Bisquick mix
  • 3 T sugar
  • 3/4 c milk
  • 3 T vegetable oil

Directions:

  1. Place cleaned and hulled berries in a large bowl and sprinkle with some sugar. Using a potato masher, smash the berries until juices release and you obtain desired consistency. I always like it pretty soupy and mashed up. Mix in more sugar to taste. Refrigerate covered.
  2. Preheat oven to 350 degrees. Prepare an 8 inch pie pan by greasing with shortening or spraying lightly with cooking spray.
  3. In a large bowl, combine Bisquick and sugar. Whisk until combined. Add milk and oil and stir until a soft, sticky dough forms.
    This batter is so easy, my 5 year old made it :)
    Pour into the pie pan and spread the dough with a spatula to the edges of the pan.
  4. Bake for about 30 minutes or until edges are turning golden brown and a toothpick inserted in the center comes out clean or with only a few crumbs.
  5. For serving- Cut cake into wedges and spoon as much strawberry on top as desired. Top with whipped cream (which I would have done if I had some on hand that day!). In my family, some of us even like to eat it in a bowl with a little milk poured on top. :)


Thursday, May 12, 2016

Enchiladas Verdes (Green Salsa Enchiladas)

I'm going to start this by saying that I have grown to truly love San Antonio. However, when I first moved here someone put in front of me a rolled tortilla with glorified Cheez Whiz oozing out of it and called it an enchilada...um, no. I wanted the REAL thing. I missed the real deal that I could order anywhere in Mexico. While I'm sure Cheez Whiz enchiladas have their place, I decided that place wasn't in front of me. :) So through the years, I've learned several different types. I'll write about this one first because it's the simplest one I do and still really delicious. You can make the salsa a day ahead and even buy a rotisserie chicken and shred it ahead as well. That makes dinner time assembly a lot easier. Enjoy!

Enchiladas Verdes (Green Salsa Enchiladas)
Adapted from Pati's Mexican Table

Enchilada Ingredients:

  • Cooked green salsa (recipe below)
  • 12 corn tortillas
  • 3T vegetable oil
  • 2 cups shredded pork shoulder or cooked/rotisserie chicken
  • 1 c simmered black beans or canned, drained
  • 1/2 c sour cream or Mexican crema
  • 3/4 c feta cheese or queso fresco
  • 1/3 c onion, chopped


Green Salsa Ingredients:

  • 2 lbs. tomatillos, husked and rinsed
  • 2 garlic cloves, paper removed
  • 2-4 serrano chiles, to taste
  • 2/3 c onion, chopped
  • 2 tsp coarse salt
  • 3 T vegetable oil


Directions:

For the salsa-

  1. Cover tomatillos, garlic, and serranos with water in a large saucepan. Simmer until tomatillos turn from their bright green color to a pale yellow/green and have softened, about 8-10 min.
  2. Remove tomatillos, garlic, and chiles with a slotted spoon. Add tomatillos, garlic, and one chile at a time to the food processor. Add onion and salt. Pulse 3-4 times then puree until smooth. Add more chile until it reaches the heat you want. 
  3. Heat oil in a large saucepan over medium heat. Pour salsa (carefully!) into the saucepan and cook, stirring occasionally, for 7-8 minutes, or until thickened. The salsa will bubble and spit, so take care!


For the enchiladas-

  1. Preheat oven to 300 degrees.
  2. Keep salsa warm in its saucepan, or reheat it gently in a saucepan if you made it ahead. 
  3. On a foil lined baking sheet, spread out 6 tortillas. Brush both sides of tortillas lightly with oil. Place tortillas in oven for 3 minutes (this will make them more pliable and prevent cracking). Place tortillas on a dish and wrap in a clean towel to keep warm. Repeat the process with the other 6 tortillas. Place them in the towel lined dish to keep warm also. 
  4. Raise oven temperature to 375 degrees.
  5. One tortilla at a time, using your fingers or tongs, dip tortillas in the salsa. Place on a plate, add about 3 T of pork/chicken in a line down the center of the tortilla, then add 1-2 T of beans. Roll up and place the tortilla, seam side down, in a 13x9 in. baking dish. Repeat this process with all 12 tortillas. 
  6. Pour the rest of the salsa over the enchiladas and cover the baking dish with foil. Bake for 15 minutes.
  7. Drizzle with sour cream or crema and scatter cheese and onions over the top. Serve hot. 


Tuesday, May 10, 2016

Easy Simmered Black Beans

Let's start this by being totally transparent. I am usually limited on time when it comes to cooking, so most of the time I use canned beans and it works out just fine. But if you are ever in the mood to do things totally from scratch, these beans are really, really good and not difficult at all. They just require you to be home long enough to leave them simmering for a couple hours. Yeah, I know, that's a challenge for me too. That said, here's a glowing endorsement: My kids don't usually eat the beans on their plate that are from the can. When I put these on their plate, they ate them all. Maybe it's a fluke, but I think they tasted better. :) I've used these beans in my Chipotle bowls, enchiladas, chili, refried beans, and more. Enjoy!


Easy Simmered Black Beans
adapted from Pati's Mexican Table

Ingredients:
  • 1 lb dry black beans, picked through to get rid of any stones, and rinsed
  • 1/2 large white onion, cut along it's equator with the root end intact (this will make it easier to remove from pot later), outer skin removed
  • 2 whole garlic cloves, paper removed
  • 1 jalapeno, whole with stem removed
  • 2-3 tsp coarse salt, to taste
  • 1-2 scallions (green onion), chopped and sprinkled as garnish
Directions:

  1. Rinse and drain the beans. Pick through them to make sure there are no small stones among the beans. Put beans in a large stock pot, and cover with a generous amount of water (about 3-4 inches). 
  2. Add the onion, garlic cloves, and jalapeno if using. DO NOT add the salt until later. Bring to a rolling boil over high heat. 
  3. Reduce heat to med low and simmer, partially covered, for 1 1/4 to 1 1/2 hours. Test them at 1 1/4 hours for softness all the way through. 
  4. Add the salt a little at a time until it tastes right. Simmer for 15 min more or until the beans are soft enough that they start to come apart between your fingers. The broth will have thickened also. If the beans are still not cooked through, you can add some water if the broth has dried out. 
  5. Remove the onion, garlic, and jalapeno. 
  6. Sprinkle with chopped scallion and serve.


Tuesday, May 3, 2016

Meatloaf with a Tangy Glaze

Confession: I've never really been a fan of meatloaf...or anything combining a protein and loaf, really. I can trace the roots of this to my summer vacations growing up. My grandmother, Geema as we all called her, liked to ease the cooking load on our yearly vacations by freezing a myriad of "make-ahead" loaves, and bringing them with her to serve for dinners. God bless her. Her heart was in the right place. But those loaves...the memories of being made to eat them and pretend we liked them will never be forgotten. My siblings, cousins, and I have never been able to agree on our least favorite. Salmon loaf? Ham loaf? Meatloaf? And we'll laugh about it forever. Thanks, Geema! I promise we loved the zucchini bread and spice bread (both acceptable loaf-pan uses). :)

So when I was a young newlywed and my husband asked if I knew how to make meatloaf, I pushed back hard. I don't do loaf! And along came America's Test Kitchen to save the day. Again. If I haven't mentioned it before, which I have, their recipes are great. It's now the meatloaf recipe my mom uses too. Changing family history, one loaf at a time. 

The things I like about this particular meatloaf: 
  • It's baked free-form, so it doesn't bake in it's own grease and has a fully glazed exterior. 
  • It's not spongy from too much bread added to the mix.
  • It's not dense, like a brick.
  • The glaze is more complex and tasty than just brushing ketchup on top
All that said, if you already love meatloaf I hope you like this one too. If you are on the fence or totally against it, I'm hoping this recipe makes you a believer. Enjoy!

Meatloaf with a Tangy Glaze
Adapted from America's Test Kitchen Family Cookbook

Ingredients:

Glaze:

  • 1/2 c ketchup
  • 1/4 c packed light brown sugar
  • 4 tsp cider vinegar
  • 2 tsp Tabasco sauce

Meatloaf:

  • 1 T vegetable oil
  • 1 onion, chopped fine
  • 2 garlic cloves, minced
  • 1/2 tsp dried thyme
  • 2 eggs
  • 1/2 c milk
  • 2 tsp Dijon mustard
  • 2 tsp Worcestershire sauce
  • 1 tsp salt
  • 1/2 tsp ground black pepper
  • 1 tsp Tabasco sauce
  • 2/3 c panko bread crumbs
  • 1 lb lean ground beef
  • 1 lb ground pork


Directions:


  1. With the oven rack in the middle position, preheat to 350 degrees. 
  2. In a small bowl, combine the glaze ingredients. Mix until combined. Set aside.
  3. Heat oil to med hi heat in a small skillet. Add onion and cook until softened, about 5 minutes. Add garlic and thyme, stirring until fragrant, about 15 seconds. Set aside to cool for a few minutes. 
  4. In a separate large bowl, whisk eggs, milk, mustard, Worcestershire, salt, pepper, and Tabasco together.
  5. To the egg mixture bowl, add ground beef and pork, panko crumbs, and sauteed onion mixture. Combine until mixed evenly (honestly, the fastest/easiest way is to just start mixing it with your hands...dig in!) and the mix doesn't stick to the bowl. If it is sticking, add a little bit more milk at a time until it no longer sticks.
  6. Empty the meat mixture onto a foil-lined baking sheet and shape into a 9x5 inch loaf shape. Brush top and sides with half the ketchup mixture. Bake for 45 minutes.
     
  7. Brush the loaf again with remaining half of ketchup mixture and bake for about 15 minutes more, or until a meat thermometer reads 160 degrees. 
  8. Let rest for 20 minutes before serving. 
  9. The fat that cooks off during baking and pools around the base of meatloaf is easily pushed away to the edges of the pan with a spatula after baking. Then you can easily slice and transfer meatloaf to a serving platter.

Tuesday, April 26, 2016

Salsa Roja

Here's a simple recipe I picked up during my time living in Mexico. Just a few ingredients, but the charring in a dry skillet adds an amazing depth of flavor. It's my go-to red salsa for fajitas, tacos, breakfast tacos, eggs, and more. Enjoy!


Salsa Roja

Ingredients:

  • 6 roma tomatoes, rinsed and left whole
  • 2 cloves of garlic, unpeeled
  • 1-2 serrano chiles, stemmed and unchopped
  • Salt


Directions:


  1. Heat a dry, 12 inch, cast iron or non-stick skillet over medium heat. Place tomatoes, garlic cloves, and chiles in the pan and allow to char on one side. Flip tomatoes, garlic, and chiles until majority of sides are charred. 
  2. Remove from pan and place whole tomatoes, garlic with husk removed, and chile into a food processor. Pulse until as smooth or chunky as you prefer. I recommend adding chiles one half at a time until desired heat is achieved. 
  3. Stir in pinches of salt to taste. 

Tuesday, April 19, 2016

Anna's Chili

I had been making chili for years, tweaking it along the way. Then I moved to Texas and was semi-forced into entering a workplace chili competition...long story. This was pretty intimidating because this is Texas, people! I was blown away when it won and started to believe in my recipe a little bit. It's one of those recipes that I make by "what tastes right" and haven't monitored the amounts I use until I decided to type it up here. I love to make this meal on days when I don't have a lot of time to cook and want to make something filling. Enjoy!

Anna's Chili

Ingredients:


  • 2 lbs. ground beef (or ground turkey for leaner chili)
  • 2 T vegetable oil
  • 1 onion, chopped fine
  • 1-3 jalapenos, deseeded and chopped fine
  • Salt
  • 1 T chili powder
  • 1 1/2 tsp cumin
  • 5 garlic cloves
  • 2-4 chipotle chiles to taste, diced
  • 1 28oz can petite diced tomatoes, with juice
  • 2 T red wine vinegar
  • 2 15oz cans black beans, drained and rinsed
  • 2 15oz cans pinto or kidney beans, drained and rinsed
  • 2 c frozen corn
  • 2 T adobo sauce from can of chipotle chiles, or to taste


Optional garnishes:

  • sour cream
  • shredded cheese
  • Fritos corn chips (to make the ever-popular regional favorite "Corn Chip Pie")


Directions:
  1. In a large stock pot over med-hi heat, brown the ground beef or turkey. Set browned meat aside and drain off fat.
  2. Add oil to the pan. Heat over med-hi heat until oil is shimmering. Add onions, jalapenos, and 1/2 tsp salt. Cook until softened, about 5 minutes. Add chili powder and cumin, toast for about 60 seconds.
  3. Add garlic and chipotle chiles. Saute for 30 sec or until fragrant. Add tomatoes with juice and red wine vinegar. Stir until combined and beginning to simmer.
  4. Add beans and corn. Taste for heat. Add adobo sauce to taste. I used a whopping 2 T of it. We like it spicy around here. :)
  5. Add salt at the end to taste and to round out flavor.
  6. Spoon into bowls and top with sour cream and shredded cheese. Serve hot.

*Optional: Corn Chip Pie- Place a handful of corn chips in the bottom of a bowl. Spoon chili over top of chips. Top with cheese and sour cream. For those uninitiated, this may sound like a strange combination. I may have even scorned it when I first moved to south Texas. But oh. my. goodness. delicious.

Thursday, April 7, 2016

Cream of Broccoli Soup

I just bought a ton of broccoli and was tired of just roasting it in different ways, as delicious as that is. So I looked in the fridge and had some leftover goat cheese that needed to get eaten too. I planned soup for dinner and bread spread with goat cheese as a side. 

This soup isn't complicated to make, is packed with lots of broccoli goodness, and not overwhelmed with too much cream. Enjoy!

Cream of Broccoli Soup
from America's Test Kitchen Family Cookbook

Serves 6

Ingredients:
  • 2 T unsalted butter
  • 1 onion, chopped
  • Salt
  • 2 T flour
  • 4 c chicken broth
  • 1 1/2 lbs broccoli, finely chopped by hand or in food processor
  • 1/2 c heavy cream
  • Pepper
  • Cayenne pepper
  • Optional: sauteed crispy bacon pieces

Directions:

  1. Melt butter in a large stock pot or dutch oven over medium heat. Add onion and 1/2 tsp. of salt and saute until onions are softened, about 5 minutes. 
  2. Stir in flour and cook for about 1 minute. Slowly stir in broth and scrape up any brown bits from the bottom (those brown bits add tons of flavor!).  
  3. Bring to a simmer and cook for 5 minutes.
  4. While broth cooks, chop broccoli in food processor. Add to the soup and simmer until the broccoli is tender, about 8-10 minutes. 
    I hand chopped these, but food processing pulses would be much faster

  5. Set another empty medium pot on the stove. Puree the soup in batches until smooth in your food processor. ***take the "food pusher" out while blending hot foods to avoid pressure build up and spewing hot food. Also, only fill half way and pulse a few times before running the processor to avoid leaking hot foods from under the lid. 
  6. Pour the first pureed batch of soup into the empty medium sized pot. Continue until all the soup is pureed. Stir in the cream.
    Bring to a simmer just for a few seconds, then remove from heat. Season with salt and pepper. Add some cayenne pepper if you want a little heat. 
  7. I didn't have time for this when I made it, but finely chopped, sauteed bacon sprinkled on top of this soup would work really well. What's not better with a little bacon??

Friday, March 25, 2016

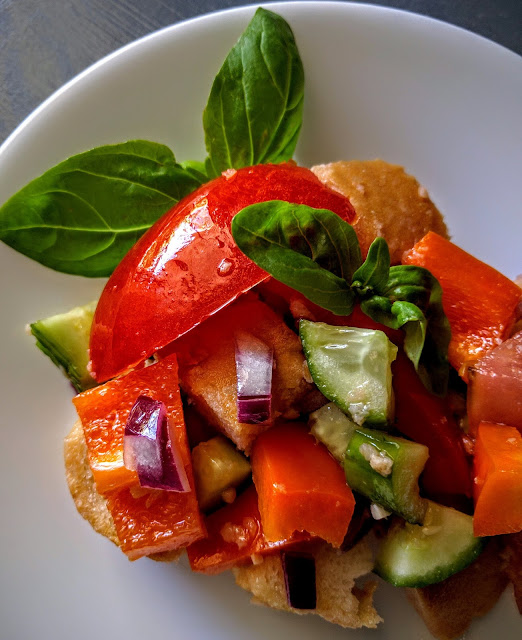
Panzanella (Bread Salad)

Several years ago, my friend Joey introduced me to panzanella and I am forever grateful. Thank you, Joey!! It was such a fresh and bright side salad, easy, and addicting! A few years ago, the original link to the recipe I had been referred to no longer existed. And alas, I had never printed it, so I was left to make up my own recipe. Enjoy!


Panzanella (Bread Salad)

Ingredients:


  • One loaf of day-old (slightly stale) hearty/crusty bread, sliced into 1 in. cubes
  • 4-5 roma tomatoes, sliced into wedges or chopped
  • 1 large cucumber, peeled, seeded, and chopped into small cubes
  • 1/2 c. red onion, chopped
  • 1 bell pepper (red, yellow, or orange), chopped
  • 3 cloves garlic, minced
  • 1/4 c. red wine vinegar
  • 1/2 c. vegetable oil
  • salt 
  • pepper
  • 1/4 c. fresh basil leaves, torn into small pieces


Directions:
  1. In a large bowl, combine cubed bread, tomatoes, cucumber, onion, and bell pepper. Mix gently. 
  2. In a smaller bowl, mix garlic, vinegar, and oil until well combined. Pour dressing over the salad ingredients. Gently mix until combined. 
  3. Allow to sit for 20-30 minutes to marinate. 
  4. Add salt and pepper to taste. Sprinkle basil over the top, toss to combine and serve. 


*This salad is most presentable served immediately. Store leftovers in the fridge. It won't look as pretty the next day, but will still taste delicious. :)

Friday, March 18, 2016

Bánh mì (Vietnamese Hoagies)

I mentioned this sandwich in the previous blog post. Second only to the hoagies I grew up eating in Philly, Bánh mì (or Vietnamese Hoagie, as I like to call it) is one of the sandwich-loves of my life. There are many variations, but generally the sandwich includes a baguette-like roll that is crusty on the outside and soft and airy on the inside, meat, cucumber, cilantro, pickled carrot, jalapeno, and mayonnaise and/or butter spread. 

This recipe's protein filling is a scratch-made pork meatball. Originally I used a recipe from Chef Charles Phan's cookbook, Vietnamese Home Cooking. However, there was way too much involved in that recipe to make it a practical recipe to make for my family AND live life with my kids. So I've simplified it and my husband still gives it two thumbs up, so I'm satisfied. :) 

Also, the type of bread you use is important and will probably change regionally. If you live in or around Philly, good hoagie rolls such as Amoroso's or Conshohocken will work well. Down here in San Antonio, I use the popular Mexican sandwich rolls, bolillos, which work well too. You can also try cutting a baguette to personal size and use that. 

Also, this recipe makes 36-48 meatballs. So you could half this recipe or make it all and freeze a bunch to have another time, which is what I do. Enjoy!


Bánh mì

Adapted from Vietnamese Home Cooking

Makes 36-48 meatballs, depending on size

Ingredients:

Sauce:

  • 4 c. chicken broth
  • 1/4 c. vegetable oil
  • 1/4 c. minced garlic
  • 1 T. red pepper flakes
  • 3 c. diced onion (I pulse chunks of onion in the food processor)
  • 1 c. stir-fry sauce (in Asian food aisle)
  • 1 c. ketchup
  • 1 1/2 T light soy sauce (I have also used regular soy sauce as a substitute)


Meatballs:

  • 3 lbs. ground pork
  • 1 1/2 c. jicama, peeled and dice (again, in food processor), or water chestnuts
  • 2 c. onion, diced (food processor)
  • 1/2 c. scallion, sliced thinly, green and light green parts only
  • 1/4 c. cilantro, chopped
  • 2 tsp. kosher salt
  • 2 tsp. ground black pepper
  • 2 T. light soy sauce


Garnishes/Spreads:
Mayonnaise
Cucumber, sliced into long 1/4 in. wide slices


Jalapeno, sliced into long 1/4 in. wide slices


Pickled carrot
Cilantro
Sandwich roll (bolillo, a good hoagie roll, baguette cut into personal size), sliced 3/4 of the way through


Directions:

To make the sauce:

  1. In a large stock pot, heat oil over medium heat. Add garlic and stir until toasted for about 2 minutes. Add red pepper flakes and toast for 30 seconds. 
  2. Add onions, and cook until softened, for about 5 minutes, stirring occasionally. 
  3. Add stir-fry sauce, ketchup, and soy sauce. Stir to combine. Add 4 c. chicken broth and mix well. 
  4. Increase heat to high and bring to a boil. Then decrease heat until sauce is simmering. Simmer for 15 minutes. 


To make the meatballs:

  1. While the sauce simmers, make the meatballs. You can roll them by hand or use a 1-2 inch ball scoop. 
  2. In a large bowl, combine all of the meatball ingredients. 
  3. Using your hands, gently mix ingredients together. Don't overwork the mixture or it may become tough. 
  4. Form into 1-2 inch diameter balls and add gently to the simmering sauce. The meatballs will be crowded in the pot, but should all be below the surface of the sauce. Cook, without stirring, for 45 minutes. So not let the liquid boil, or the meatballs may begin to fall apart. After 45 minutes, remove a meatball and cut it open. There should be no pink inside. 
  5. Remove from heat and serve. Or you can let them cool and and reheat later in the sauce. 
  6. To freeze leftovers, use a tupperware container. Fill 3/4 full with both meatballs and sauce. I like to freeze in batches of 12 meatballs each. Cover and freeze. 


Assembling a sandwich:
Lightly toast the roll in a toaster oven or oven. Spread both sides of the roll inside with mayonnaise. Layer with carrots, cucumber, and jalapeno. Add warm meatballs. Enjoy!!


Monday, March 14, 2016

Pickled Carrots (AKA the perfect sandwich toppers)

These might seem like a strange idea if you've never had them. But the first time I had pickled carrots years ago was on a Vietnamese sandwich called banh mi, which I promptly called the Vietnamese hoagie. I am a die-hard-it-has-to-be-the-perfect-hoagie girl. For the same reason I NEED dill pickles on my hoagie, a banh mi sandwich NEEDS pickled carrot. Pickled deliciousness is the perfect balance to the rich saltiness of all the meat.

These are simple to make, speedy quick, and keep well in the fridge to use on all kinds of things to brighten them up and add some zip. I've used them on sandwiches, banh mi, tacos, salads, and more. Enjoy!


Pickled Carrots

Makes 2 cups

Ingredients:

  • 1 c. white vinegar
  • 1/3 c. sugar
  • 1 tsp. kosher salt
  • 2 c. carrots, peeled and cut into 4 in long sections, shredded through shredding blade of a food processor or shred by hand on a grater


Directions:

  1. In a small bowl, combine vinegar, sugar, and salt. Stir until dissolved.
  2. Add carrots and stir until combined. Let stand for 30 minutes before using.
  3. Refrigerate for later use and drain well before serving.


Tuesday, March 8, 2016

Chipotle Salad Bowls

For more reasons than one, we haven't been to Chipotle in a while. But one of the main reasons is because I started making their salad bowls at home, and we all love them. I made them for my whole side of the family for dinner over Christmas break, and it was gobbled up. Also, this is a great dish to use that green salsa recipe I posted!

There are several components to get together for this dish. But what I love about it is that I can make/prep all components a day ahead or as I have time. Then I just pull them all out at dinner time. 

I'd also like to say that for years I fought the idea of putting salad dressing on my Chipotle bowl. I would think, "Who needs it when I already have delicious salsa?", and I'd never use it. Then one day, I DID use it. And it entirely changed the whole salad bowl for the better. Enjoy!


Chipotle Salad Bowls

Serves 4

Basic Bowl Ingredients:

  • Lettuce, cut into bite-size pieces
  • 2 c white rice, cooked according to package instructions
  • 2 cans black beans, drained and rinsed well
  • 3 c shredded rotisserie chicken, warm (or if you have access to someone who smokes chicken in a BBQ, like my husband, use that. It's amazing!) 
  • Corn salsa

Corn Salsa Ingredients: Mix following ingredients together in a bowl. Refrigerate for 30 min or more to allow flavors to combine.


  • 12 oz bag frozen corn, thawed and drained
  • 1/8 c red onion, finely chopped
  • 1-2 serrano peppers, finely chopped (add according to how spicy you want it. While I love spicy, I don't put too much in the corn salsa because I don't want to lose the delicate sweet flavor from the corn)
  • Juice from 1 lime, or to taste
  • Salt/Pepper to taste

Garnishes (amount according to taste):

Directions: 

  1. You can layer and combine components any fun way you want. This is just how I do it. :)
  2. Place a layer of lettuce in the bottom of each bowl. Top with a layer of rice, black beans on top of that, and shredded chicken. Add salsa and corn salsa. Top with shredded cheese, sour cream, and dressing.


Wednesday, March 2, 2016

Crispy Roasted Potato Wedges

I love using red potatoes since they don't require peeling. There's also something special about crispy-on-the-outside and soft-on-the-inside potatoes. These potatoes may take a little longer than skillet potatoes, but they are pretty hands off while they roast. And they are so tasty! My husband loves them, and my kids inhaled all the leftovers the next day....much to my husband's chagrin. :) Enjoy!


Crispy Roasted Potato Wedges
Adapted from America's Test Kitchen Family Cookbook

Serves 4

Ingredients:

  • 6 medium red potatoes, sliced into 3/4 in wedges (I tested this with thinner wedges, but the thicker wedges were easier to flip without sticking and breaking. Also, if you get large potatoes instead, you will be making several batches as it will be too many and overcrowd your baking sheet.)
  • 3-4 T olive oil
  • salt and pepper to taste
Directions:

  1. Preheat oven to 425 degrees. Line a large baking sheet with tin foil and brush foil with a thin coating of olive oil. 
  2. Scrub and rinse the potatoes. Slice potatoes and place in a gallon-sized Ziplock bag. Drizzle oil into the bag and sprinkle some salt and pepper into the bag as well. Seal and shake/massage the bag until all the potatoes are coated with oil and salt/pepper is distributed.
  3. Dump potatoes onto the baking sheet, making sure each piece has one cut-side down.
     
  4. Cover the sheet with tin foil and place on the middle rack of the oven. Roast covered, for 20 min. 
  5. After 20 min., remove foil (carefully!!) and place back in the oven. Continue to allow the first side to roast for 10-15 min more, until that side is browned nicely (golden brown). 
  6. Remove pan from oven and flip each potato to the other cut-side. (tongs or a metal spatula worked well for me) Place back in the oven for 8-10 min more, or until the other side is well browned. 
  7. Remove from oven, sprinkle with some coarse kosher or sea salt. Serve hot.